
Elcometer 456 in Practical Use: How to Measure Deposits in Ventilation Ducts
The Elcometer 456 Duct Deposit Measuring System is the professional companion for assessing dust and grease deposits in ventilation and kitchen exhaust systems made of ferromagnetic metal. This guide shows you step-by-step how to use the system efficiently, obtain reliable readings according to HVCA TR/19, and generate meaningful reports.

Product Overview: What the Elcometer 456 System Offers
The system is specially designed for inspecting ventilation systems and combines robust hardware with powerful evaluation software. Here is an overview of the key components and areas of application:
| Component / Aspect | Details / Benefits |
|---|---|
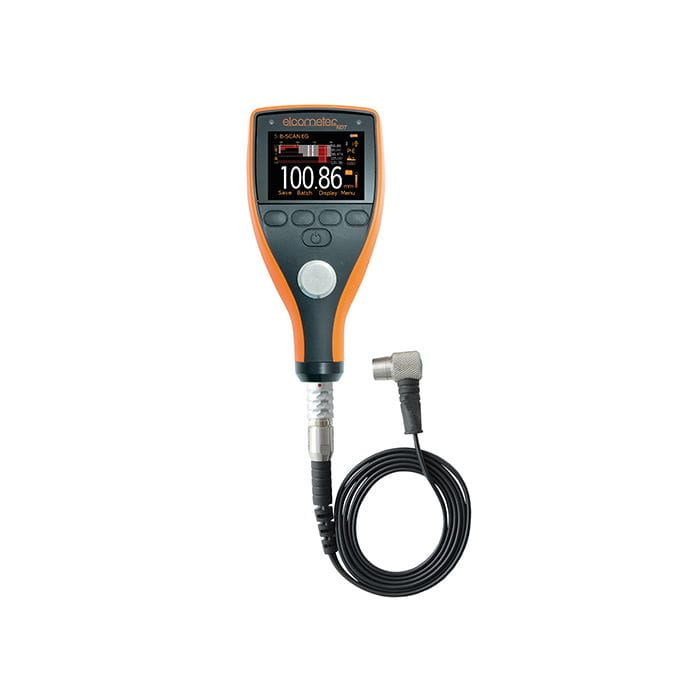
| Gauge | Elcometer 456 Model T with ferromagnetic 2B probe (0–5 mm). Easy operation via softkeys, internal storage of measurement series. |
| Main Application | Thickness measurement of dust and grease deposits in ventilation systems and kitchen exhaust ducts made of steel (ferrous metals). |
| Standard Compliance | Supports execution of Deposit Thickness Tests (DTT) according to the HVCA guideline TR/19. |
| Software & Reporting | Supplied with ElcoMaster™ 2.0 software including a dedicated “Duct Deposit Report” template for professional evaluation and documentation. |
| Data Transfer | Wireless via Bluetooth® or USB cable. Easy export of measurement data from the device memory to a PC. |
High Accuracy
The ferromagnetic 2B probe provides typical measurement accuracy of ±1–3% or ±2.5 µm in the range 0–1500 µm (whichever is greater).
TR/19 Compliant
The included Duct Cleaning Template enables standardized before/after measurements at precisely defined points, as required by the guideline.
Easy Documentation
Automatic generation of professional inspection reports directly from ElcoMaster™ 2.0 – including statistical values such as mean and standard deviation.
Ready for Professional Ventilation Inspection?
The Elcometer 456 Duct Deposit System provides the technical foundation for reliable cleanliness assessments and compliant documentation.
View Product in ShopRecommended Basic Settings (Reference Values)
For beginners in deposit measurement, the following device settings have proven effective. These are reference values and may be adjusted as needed.
- Units: Micrometers (µm) for precise thin-layer thickness readings.
- Measurement Mode: Activate Batch Mode (“Batch”) to automatically store all measurements of an inspection area in one group.
- Statistics: Enable the statistics function (“Stats”) to display mean, standard deviation, etc. directly on the device.
- Display Timeout: Set to e.g. 60 seconds (Menu/Setup/Display/Screen Timeout) to save battery during series measurements without shutting off too quickly.
- Auto Shutdown: Default is after 5 minutes of inactivity. Manually switch off during long breaks.
Professional Workflow: Before/After Cleaning Measurements in 7 Steps
- Prepare the device: Insert batteries, set language (if needed: hold left softkey while turning on), calibrate device according to Chapter 6 using calibration foils on a zero plate.
- Connect the probe: Position the probe on the gauge, align pins, and tighten the knurled nut clockwise.
- Start the batch: Begin a new measurement batch (“Batch” button) to group all subsequent 20 readings.
- Perform the before-cleaning measurement: Position the Duct Cleaning Template in the area to be inspected and mark the corners. Then measure through all 20 holes of the template and store the values in the batch.
- Cleaning: Remove the template and clean the marked area inside the duct.
- Perform the after-cleaning measurement: Precisely reposition the template using the markings. Measure all 20 points again in the same order. Values are stored in the same batch to enable direct comparison.
- Evaluate the data: Connect the gauge to your PC via Bluetooth® or USB, start ElcoMaster™ 2.0, download the batch, and create a professional inspection report using the “Duct Deposit Report” template.
Troubleshooting: 4 Common Problems and Solutions
1. “--” Display (Measurement Out of Range)
- Cause: The measured layer is thicker than the probe range (e.g. >5 mm), or the probe is not properly connected or calibrated.
- Action: Place probe on a calibration foil of known thickness. Does it work? If not: repeat calibration. If yes: switch to the second measurement scale (0–5 mm) or check cleaning level.
2. Unstable or Incorrect Readings
- Cause: Probe is dragged over the surface, hovering, or pressed too hard. Or the surface is heavily curved/uneven.
- Action: Always place the probe vertically and gently, ensuring the sleeve touches the surface. Lift completely between readings. Measure on flat surfaces.
3. Bluetooth® Connection to PC Fails
- Cause: Bluetooth on PC disabled, device not paired, out of range, or interference.
- Action: Enable Bluetooth on PC. Follow the pairing guide in ElcoMaster™ 2.0 Help Menu. Alternatively use USB cable or a Bluetooth USB adapter (e.g. T99920130).
4. Device Unresponsive / Constantly Shutting Down
- Cause: Weak batteries or display timeout/auto-off set too short.
- Action: Replace batteries. In Menu (Menu/Setup/Display) increase “Screen Timeout.” Note: Device turns off completely after 5 minutes.
Maintenance & Care for Long Service Life
- Protect the probe: The 2B probe tip is delicate. Always cover with the protective cap after use and store in the case.
- Clean the housing: Clean device and template after use with a soft, slightly damp cloth. Do not use aggressive cleaners.
- Batteries: Remove batteries if the device will not be used for a longer period to avoid leakage damage.
- Check calibration: Regularly verify accuracy, e.g. at the start of each new project, using calibration foils.
- Keep software up to date: Check the Elcometer website regularly for updates to ElcoMaster™ 2.0.
FAQ – Frequently Asked Questions About the Elcometer 456
1. Which materials is the Elcometer 456 suitable for?
The supplied system with the ferromagnetic 2B probe is specifically designed for measurement on ferromagnetic metals (e.g. steel). Other materials require different probes.
2. How many readings can the device store?
The exact storage capacity is listed in the device manual. However, multiple batches with many individual readings (such as the 20 measurement points per template) can be stored. For large projects, regular data export is recommended.
3. Do I need a new template for each measurement area?
No, the template is a reusable positioning tool. It is positioned, the corners are marked, measured, and then it can be used for the next area.
4. Can I create my own report layouts in ElcoMaster™ 2.0?
Yes, the software includes a Report Designer that allows you to design reports according to your own specifications. The pre-made “Duct Deposit Report” template serves as an ideal basis for TR/19-compliant reports.
5. Where can I find spare parts or accessories?
Replacement calibration foils (T99022255-8), zero plates (T99913969), additional templates (T99913939) or Bluetooth adapters (T99920130) are available from your Elcometer dealer or directly in our online shop.
Conclusion
The Elcometer 456 Duct Deposit Measuring System is a well-designed and practical tool for anyone who needs to objectively and compliantly assess the cleanliness of ventilation systems. From easy operation to precise measurement to professional reporting with ElcoMaster™ 2.0, it supports you at every step of the inspection. With the right preparation, calibration, and application of the workflow described here, you will obtain reliable results that impress both internally and with customers.